


How To Use HGH


Instructions and Protocol for Injection
Read over these instructions thoroughly and carefully before you undergo your first injection. This information was gathered so that you can self-administer your injectable HRT therapy effectively and safely.
Prepping for self-injection administration:
1. Wash hands extremely thoroughly with warm water and soap.
2. Choose a clean, complex, and well-lit surface that has a mirror, if possible (the countertop of the bathroom is an excellent location)
3. Make sure that you have gathered all the supplies you will need and that there is no sign of damage or tampering with the wrapping or packaging of your medication and your devices. Recheck the dates of expiration on each medication.
Notice: When taking Testosterone injections Intramuscularly for low testosterone, you will be using two needles. The first needle will be used to draw in the medicine. This needle will be referred to as the drawing needle. The second needle will be used to administer the solution. This needle will be referred to as the administration needle.
Taking up the solution with the syringe:
1. Use sanitizing alcohol swabs to disinfect the vial tops. Sanitize in a single direction and only use one swab per vial.
2. Take the syringe and the needle out of the packaging and fill up the syringe with the same amount of air you will later fill with your dose of medicine. Do this by pulling back on the plunger until the mark you desire is reached (for example, If you plan on taking up 2 milliliters of the solution, you would draw the plunger back to the 2 marked on the syringe
3. Press the needle directly through the rubber stopper to enter the vial. If you make bodily contact with the stopper, use another new alcohol swab to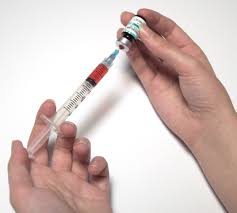 disinfect it again before drawing out the medication.
4. Flip the vial of medication with its base facing upwards. Keep the tip of the needle within the liquid.
5. Press down on the plunger, ejecting the air in the needle into the vial of medication. This action will aid in maintaining a balance of external/internal pressure when working with a vial made of glass. It also helps to make later withdrawals of medication much more accessible.
6. Hold the syringe and vial in one of your hands, and then draw the proper dose of medication up into the syringe slowly and carefully. The first diagram demonstrates the appropriate technique to use when holding the vial.
7. As you hold the vial with its base facing upwards, and while slowly drawing the medication into the vial, tap gently upon the side of the syringe. Air bubbles will float to the top of the syringe barrel. Press the plunger extremely gently so that ONLY THE BUBBLES OF AIR are ejected from the needle.
8. Pull the syringe and needle from the vial.
9. Recap your needle. Place the cap of the needle upon your hard, flat, sterile surface and guide your needle into its cap with care. This action makes it much less likely that you will accidentally poke yourself with the needle.
10. When taking an Intramuscular injection or a Testosterone injection, pull out the drawing needle and dispose of it in a Sharps container approved by OSHA. FDA Regulations legally require you to dispose of sharps and needles in an approved biological, medical waste receptacle. If you do not have one of these containers, you should give us a call immediately and acquire one. ALWAYS DISPOSE OF YOUR NEEDLES WITH PROPER CARE.
Solution Injection:
Keep medical materials and syringes clean. Do not let any object touch the and of the needle or syringe. If you touch the syringe or needle tip accidentally, or contaminate the needle or syringe in any manner, it must be thrown away, and the process must begin again. This ensures that you will not acquire an infection.
1. For Intramuscular or Testosterone injection, take the new administration needle from its package and check for any possible defections. Do not take off the plastic cap until it is time for injection.
2. Twist the administration needle firmly onto the syringe. Keep it in. Firmly twist the administration needle on to syringe and maintain it on the hard, flat, clean surface in front of you until it is time to begin administration.
3. In the case of the SUBQ injection, the small syringe of insulin comes preloaded with an attached needle that is impossible to remove. This is the vehicle of administration.
4. Use a fresh swab of alcohol to disinfect the skin around your planned injection site. Let it dry in the air. Discard the wipe. (Notice: Never inject into a site where there are firm knots, bumps, lumps, or pain. Never use an area where the skin is depressed, discolored, scabbed, or broken. Call your physician or another health professional if you are unsure if an area is safe.
5. Take off the cap to the needle and pinch the area of skin where you plan on administering the injection so that you raise it up slightly. Check the second diagram. The easiest and safest areas to administer the needle are located away from your bones, nerves, joints, or any other essential or  obtrusive body area. Turn to the last page to view a diagram of preferable sites for injection. The most accessible areas to perform Intramuscular injections like testosterone are the quadricep or gluteus maximus. The most accessible area for Subcutaneous injections like GH and HCG is located around the belly button on the stomach.
6. Using a swift, firm motion, press the needle into the skin at a ninety-degree angle when performing an IM injection or at a forty-five-degree angle when performing a SUBQ injection.
*The seventh step is meant ONLY FOR INTRAMUSCULAR INJECTIONS! ONLY! For subcutaneous injections, move on to Step 8*
7. Intramuscular: As the needle continues to be inserted into the muscle, pull the plunger back very slightly and check for blood in your syringe.*This will occur rarely. If you have this experience, it merely means that you inserted the needle and struck or landed near a blood vessel. If so, pull the syringe and needle out and massage the area gently where the needle was inserted with a clean tissue or gauze. Return to the second step and repeat the process after choosing a new site for injection.
8. Administer the medicine by performing a slow and steady plunger push until the point is reached where the syringe is 100% empty. Press a gauze or swab close to the site of injection.
9. Safely yet swiftly pull the needle out from the skin and gently massage the injection site with gauze or dry cotton.
10. Throw away the syringe immediately into an approved Sharps disposal container by OSHA.
11. Store all medication and supplies in a proper and safe place that is out of the reach of strangers and children. Make sure that medical supplies and medicines that require refrigerated storage are put away correctly.
12. After you have accumulated enough medical waste in your OSHA Sharps Disposal container to reach the recommended fill line, you should call your local waste disposal management provider and follow the guidelines in your area to dispose of the medical waste responsibly.
The above information is provided to you only for purposes of information. This document is not supposed to be a surrogate for the instruction that your bio-identical hormone replacement therapy doctor or any other qualified medical professional can provide more fully. Do not use this information to self-diagnose or self-treat a disease or health ailment.
Neither should you use it to self-prescribe medication. If you feel that you have or know that you have a medical issue, contact a health representative, physician, or health provider as soon as possible and appropriately.
- 0001) Tev-tropin Human Growth Hormone Injection Information [Last Updated On: December 27th, 2025] [Originally Added On: November 15th, 2020]
- 0002) Bio-identical Somatropin Injection Therapy [Last Updated On: December 26th, 2025] [Originally Added On: November 16th, 2020]
- 0003) Saizen Hgh Hormone Replacement Therapy Treatment [Last Updated On: December 25th, 2025] [Originally Added On: November 17th, 2020]
- 0004) Nutropin Bio-identical Human Growth Hormone Injections [Last Updated On: December 24th, 2025] [Originally Added On: November 18th, 2020]
- 0005) Norditropin (Injectable HGH): The Basic Facts for Patients with HGH Deficiency [Last Updated On: August 29th, 2025] [Originally Added On: November 19th, 2020]
- 0006) Information About 5 Mg Humatrope Vials [Last Updated On: December 23rd, 2025] [Originally Added On: November 20th, 2020]
- 0007) Information About 5.8 Mg Omnitrope Hgh Vials [Last Updated On: December 22nd, 2025] [Originally Added On: November 21st, 2020]
- 0008) Humatropen Human Growth Hormone Injection Device Information [Last Updated On: May 23rd, 2025] [Originally Added On: November 22nd, 2020]
- 0009) Humatrope Bio-identical Hgh Injections [Last Updated On: December 21st, 2025] [Originally Added On: November 23rd, 2020]
- 0010) Cool.click 2 Serostim Injection Device Information [Last Updated On: December 20th, 2025] [Originally Added On: November 25th, 2020]
- 0011) Non-Injectable Options for HGH Therapy [Last Updated On: April 28th, 2025] [Originally Added On: May 10th, 2023]
- 0012) Introduction to Using Human Growth Hormone (HGH) [Last Updated On: February 14th, 2025] [Originally Added On: February 14th, 2025]
Word Count: 1318
